Ok, I know, I disappeared for a really long time. I am really sorry, but I do hope you will forgive me when you see what I've been working on:
A NEW car track!
It is a lot like the one found here, but there is next to no sewing involved and it is bigger... so more fun right?
Supply list:
1/2 yard of light green cotton fabric
1/2 yard light brown cotton fabric
1/4 yard of cotton fabric in the following colors: grey, blue, dark green, dark brown
(small amounts of red and orange too >1/4 yard)
~3 yards of Ultra heat and bond
2/3 yard of a 50 inch wide fabric - I chose canvas for durability
Puffy paint in all the above colors + white
Iron
Pencil
on the light brown fabric and cut it out (with the heat and bond)

Iron this piece onto your light green fabric.
Next, cut each of your 1/4 yards in half at the fold. Iron each of these pieces onto someheat and bond. Draw the objects you want in each color onto the paper back of the interfacing with a pencil. (Brown tree stumps, Dark green tree tops and bushes, grey rocks, blue lakes and streams, etc)
Cut out all of your shapes! (this takes a while, but it is worth it!)
Now, start thinking in layers. you want to layer your objects onto the background to create depth.
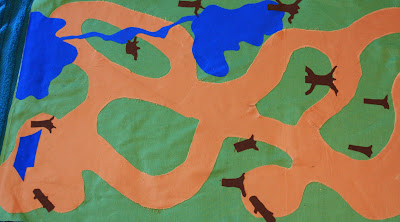
Once you have everything where you want it, pull out that iron and get started! At this point, securing everything takes minutes rather than the hours I spent sewing each piece on the first time around. ( I put a towel under my track before I put all the pieces on on my large table, so that I didn't have to worry about possibly ruining the table or moving the track to the ironing board)
Next we are working with the puffy paint. I started in the upper left corner with each color and outlined everything in that color (I usually had to wait 15 min between each color so that I didn't smudge anything) Then after everything was outlined I went back and added all of the details in the same maner.

The final step is the backing, I used canvas and made sure it was ~ 1 inch wider than my track all the way around. Then I rolled and finished it just like I would a lap quilt (fold in half once and iron, fold in half again and sew around the the inside edge).

And you are done! Bug could not wait to get his hands on it and was thrilled when he finally got to play with it. I plan on making a bunch of these with different themes so that the boys can lay them out in different arrangements for creative play, or we can pick one or two to take to a friend's house or on vacation.

8 comments:
Cool!!! Question though, by interfacing, do you mean an iron-on adhesive like Heat n' Bond? The fusible interfacing I use when I sew is only adhesive on one side, not both. Just clarifying. :-) Since you're using fabric paint rather than stitching it down, I'm assuming you used Ultra strength?
Oh, yes! I'm still learning about applique and everything, lol. So, it is ultra strength heat and bond. :)
Cute! Those boys have no idea how lucky they are to have such a crafty mom!
thank you so much for this tutorial. i'm thinking about attempting to create a LARGE mat for my boys, and this method will definitely be much less time consuming. maybe it will now get done for Easter instead of Christmas.
Oh that is so sweet, thanks for sharing!
Carlee,
ladybirdln.blogspot.com
So cute! I bet it is a big hit! Thanks so much for linking up!
What a cute idea for your little one! Thanks for stopping by my funnel cake post. Wednesdays I feature a bunch of recipes. I'd love for you to stop by if you get a chance.
Very Cute!
Post a Comment