Sunday, May 8, 2011

Ah blog, how I've missed you...

My husband has been gone for the last 2 months for business, so most of my time was just spent surviving his absence. You would think it would be that bad because of the already long hours he works, but not having another person around can really weigh you down. I rarely saw other adults, and when I did I clung to every second of conversation like a drowning man to a life line. I woke each morning exhausted from the day before, and crashed each night into dreamless slumber. I didn't craft, I didn't have the mental capacity or energy. So please excuse my absence, I thought of you, and fondly dreamed of working and posting here again. As soon as the crazy wears it's self out, I will be back with exciting projects and ideas!

Wednesday, April 6, 2011

"Invitation only" internet stores

So far I have only reviewed one product, the mini shop vac, but I intend to change that... I thought that today I'd cover those tempting invitation only stores. I love shopping online, especially when it means I can get a really great deal on really nice products. Having a computer savvy hubby made me wary of the plethora of Internet shops out there, but after searching everywhere for affordable/ nice Christmas gifts a few years ago, I thought I'd take the risk. I joined a few and found some great deals. I joined others and met some problems, some of the companies went out of business and left their customers waiting for orders that would never arrive! (Thank goodness that didn't happen to me, I'd never purchased anything from them)


A few suggestions when looking at which ones to join; Talk to people you know who have PURCHASED from the companies, not just people who get the emails. Research the companies (bbb, customer reviews, etc). Look for a company with a great return policy.Go through Paypal whenever possible for purchases. Never let them store your card numbers, if they get hacked you get hacked.


Suggestions for buying from them: again, Paypal, it keeps you safer. You have to be a "quick buyer" not someone who wants to sit and think about it before you hit the purchase button, things go quick when there is a great price (this was hard for me, I always think about a purchase forever before I buy, with these I learned to look at who was in the next week's line up of sellers and researched whether they sold the items I was looking for, what the original price was, what they went for on ebay, reviews etc. so that I was completely ready to hit that "buy" button if it was a sale price I was willing to pay). Be flexible with color/pattern. Don't be heartbroken if it gets away, sometimes that is just how things go. Be prepared to wait 2-3 weeks + to get your items.


Example: I really wanted some nice, cute, comfortable rain boots. I looked at Target. I looked at Walmart. I looked at tons of shoe stores online. I really wanted something of quality, but I didn't want to pay much. Insert one of the invitation only websites. A few months ago they had been selling designer rain boots for really amazing prices, Walmart prices. I was bummed that now that I realized I could really use a pair of rain boots (all the rain we get here and working in the garden) they weren't selling them. I did notice that they tend to sell in cycles, and I waited to see if the seller would come up again since it had been super popular. In the mean time I checked reviews of the maker, the boots, their prices everywhere and even picked out styles I would be interested in. Then that lucky day came, I got the email from said company advertising the sales of the day and saw my boot brand. I jumped in. 2 of the patterns I liked were sold out of my size within minutes, but a third was still available. I jumped on that "buy" button, and purchased a beautiful pair of designer boots for $5 less (even with shipping) than a pair of plain, boring, uncomfortable rain boots from Target that I'd tried on. And for the first time ever I am looking forward to a rainy day. It did take 2 weeks for my item to ship, but because I knew that ahead of time it wasn't a problem (an annoyance maybe, but not a problem).


Now, these places can be very dangerous for many reasons (hackers, bad business practices, etc), but one that I do need to warn about is obsesive online shopping. Be careful of debt. Dont overspend, and dont buy JUST because it is on sale. But, if you do your research these companies can be a great place to get those really nice things you have been dreaming of for a really great price.


I hope this has been helpful to someone!

Recycling, composting and gardening

I promise that this blog isn't always going to be about gardens, but those are the only big projects I am working on/finishing currently, so that is what you get! *sticks tounge out*;)


Last year, in anticipation of starting a garden, I started a compost bin from an old covered trash can (the kind that is $7.00 at W). This week I added little workers to it in the form of Red Worms. Let me tell you, they were not easy to track down, none of the bait shops had any sort of worms at all, so I turned to the world wide web. There are quite a few places that sell them, but I wanted something close geographically and cheap (I only wanted 100 to start out). I finally purchased mine off of ebay from a seller in New Orleans, can't get much closer than that! They were here 2 days later. I tossed them in and they got to work, I havn't seen them unless I've gone looking, so they must be digging deep. In my search for worms, I learned that you can't use night crawlers or other forms of worms because they dont hold up to the heat in my style of compost bin. I am still holding out hope for a nice vermicomposter that will house several hundred of the squirmy critters and produce tons of fresh rich soil and worm tea for my garden.


Next up is my little project for the garden: a recycled watering can. I dont use a watering can often, so I couldn't see the point in spending $5-$15 on one. I started wondering if I could make one out of things I have sitting around. In our family, we go through gallons of apple juice, so I always have some of the bottles sitting around and waiting for recycling day. I grabbed one and got to work. It was easy and took me less than 5 minutes, and most of that was gathering tools and taking pictures!


First I pulled out my drill and a really small bit.


Then I drew a circle on the bottle with a marker where I wanted my spout to be.


Next I drilled holes in a random fashion inside the circle.


Finally I drilled one air hole on the back side of the bottle (If you dont do this then you have to squeeze the water out and wait for it to "glug, glug" before moving on ;) )


Fill it with water, put the cap on and get to watering! easy right?


Here are a few pictures of the plants in my garden, they look great right? :)

Have a great day everyone!

Monday, March 28, 2011

Pallet Herb Garden

I'm on a bit of a gardening kick lately. With gas prices and food prices forever increasing, I am more convinced than ever that it is in my family's best interests financially to have a home garden. Fewer trips to the grocery store equals more money in the bank account. Plus it will be easier to eat healthier. Win/win.


I was directed to a great idea for gardening in a confined space today. Pallet gardens! more specifically, I plan on turning a pallet into an herb garden. Here is the link if you are interested in the "how to". I think it is great for appartment dwellers, or people like me that just dont have the backyard space for a "serious" garden.


I'm looking forward to showing you how well my little container garden is doing, the squash sprouts broke through today and I can just see a couple of carrot sprouts. It isn't much, but it is a start and covers the family favorites for veggies. Still waiting on the bell pepers and the pumpkins. Pictures will be posted soon!

Wednesday, March 23, 2011

Any guess?

Any guess as to what I have cooking up outside? here is a hint:


This is my attempt at container gardens... right now we are in the "greenhouse" phase... I tend to over water seeds, and I've found I'm less likely to do that if I have a greenhouse system going on.

So here is what I have done:

Supplies:

2 big plastic tubs,

several bags of potting soil, garden soil and manure fertilizer mixed well together with peat moss,

seeds, plastic sheeting, string, PVC pipe, and a cup of water.

I've filled the tubs with the soil mixture, planted the seeds as directed (we have carrots, zucchini, yellow squash in one, and in the other a pumpkin grouping in the center ). Then I took a cup of water and placed it in a corner without seeds and a PVC pipe placed almost center (depending on the placement of plants) and covered it with plastic sheeting. The sheeting was tied down with a string under the lip of the tub. I plan on checking the water levels daily so that I don't bake the plants or over water them.

When it looks like I have a lot of good plants, I'll transfer some to other tubs, but right now I'm just hoping that things will grow and that this wont all be for naught. Each of the squash plants will have thier own 18 gallon tub. When we are out of the greenhouse part I will drill a few small holes in the base edge of the tubs for water drainage.

I do need to paint the tubs white so that they don't get too hot and hurt the roots, but that needs to wait until I can get to the hardware store and pick up plastic compatible spray paint

Let me know what you think! I'm still learning about the gardening thing, so hopefully all my research was right and this works out! :)

Friday, March 18, 2011

Extend the life of your Dark wash jeans!!!

I just tried this today, and if you guys are interested I'll write a tutorial on how I did it...

So, I love dark jeans, especially on my little boys, but I've found that after several washes they fade... a lot. It drives me crazy. Well, I've wondered for a while if I could dye them dark again, or if that would ruin them. I finally broke down and tried it on the only pair of jeans Bug has... and it turned out great! They look almost new again! I still need to find that perfect shade of dark denim dye, but for now the Rit Dye in navy is doing the trick.

So if you'd like me to show you how I did it, let me know... it is super simple, but I know I was scared going in blind. :)

Have a good one!!!

Wednesday, March 2, 2011

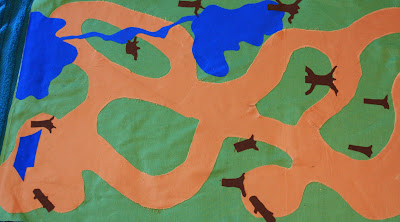
Car track mat tutorial... very little sewing!

Ok, I know, I disappeared for a really long time. I am really sorry, but I do hope you will forgive me when you see what I've been working on:


A NEW car track!


It is a lot like the one found here, but there is next to no sewing involved and it is bigger... so more fun right?


Supply list:

1/2 yard of light green cotton fabric

1/2 yard light brown cotton fabric

1/4 yard of cotton fabric in the following colors: grey, blue, dark green, dark brown

(small amounts of red and orange too >1/4 yard)

~3 yards of Ultra heat and bond

2/3 yard of a 50 inch wide fabric - I chose canvas for durability
Puffy paint in all the above colors + white

Iron

Pencil


on the light brown fabric and cut it out (with the heat and bond)

Iron this piece onto your light green fabric.
Next, cut each of your 1/4 yards in half at the fold. Iron each of these pieces onto someheat and bond. Draw the objects you want in each color onto the paper back of the interfacing with a pencil. (Brown tree stumps, Dark green tree tops and bushes, grey rocks, blue lakes and streams, etc)


Cut out all of your shapes! (this takes a while, but it is worth it!)
Now, start thinking in layers. you want to layer your objects onto the background to create depth.


Once you have everything where you want it, pull out that iron and get started! At this point, securing everything takes minutes rather than the hours I spent sewing each piece on the first time around. ( I put a towel under my track before I put all the pieces on on my large table, so that I didn't have to worry about possibly ruining the table or moving the track to the ironing board)
Next we are working with the puffy paint. I started in the upper left corner with each color and outlined everything in that color (I usually had to wait 15 min between each color so that I didn't smudge anything) Then after everything was outlined I went back and added all of the details in the same maner.


The final step is the backing, I used canvas and made sure it was ~ 1 inch wider than my track all the way around. Then I rolled and finished it just like I would a lap quilt (fold in half once and iron, fold in half again and sew around the the inside edge).


And you are done! Bug could not wait to get his hands on it and was thrilled when he finally got to play with it. I plan on making a bunch of these with different themes so that the boys can lay them out in different arrangements for creative play, or we can pick one or two to take to a friend's house or on vacation.


Catch a Glimpse Button


Oh My Goodness! I made it into the top 10!

Wednesday, February 16, 2011

Super easy Shelves!


I have been working on getting my crafting area organized so that I could actually use it. First up was the sewing desk... it is this strange little nook at the top of the stairs, just big enough for a computer, but since all of ours are kept downstairs I got to turn it into a space for me. With help from Ana White's blog, I made these fun shelves to hold all of my sewing/crafting things (ok, well not all of them, but most of what I use often). Take a look:

(sorry for the bad photo, there isn't much light in this part of the house)

I also build the same type of shelf for Bug's room. Now he can get to all of his books and pick out what he wants read befor bed.


Have a great day and thanks for stopping by!

Tuesday, February 8, 2011

New lamps

I picked up two of these cute lamps at a local hotel sale, they were brand new and in the plastic.
I loved the classic lines and they were a great steal at only $6 each.
Now I am torn on what color to paint them, because they won't work in our room in thier current color... the choices are between Black and Silver. Any help deciding would be much appreciated!

Thursday, February 3, 2011

Ties!

I've been searching the internet for cute/easy boy things to sew. While there are hundreds of dresses and skirts and even cute pants for girls, there are very few things out there for boys. I did find a few tutorials for really easy ties. A Traditional tie and a Bow tie. I was super excited to try them out, so with some cotton calico fabric for Valentine's day (and the super cute owls Bug picked out) I whipped out these cute little guys:


They took less than a half yard to make both ties (with the same print) Although you still need to buy the half yard because of how you cut the fabric.

The bow ties were the easiest, though I did substitute velco for the bow tie hardware she mentioned, I figured if my almost 1 year old wanted it off, I didn't want him to hurt himself when he tried to ditch them.

I hope you guys find the tutorials helpful!

Shared at:

A Glimpse Inside

Monday, January 31, 2011

Artwork

Bug's room wouldn't be complete without some artwork on the wall, and since we can't paint in our military housing, a large canvas piece was definitely needed. I asked him what he would like and he got very excited and yelled, "Rockets!" So a rocket was the plan... I wanted to go with a 1940's science fiction style rocket. I really like how it turned out so far, the coolest part has yet to come in the mail though. :) I found this really neat company that sells kits for fiber optic lights and my plan is to add fiber optic lights as stars all over the canvas. I will try to get a picture up once that part is finished, but I couldn't help posting a picture of how it looks now in the little guy's room:
Thanks for checking it out! Have a great day!

Friday, January 28, 2011

Dresser before and after :)

Bug's dresser was a difficult little beast. First off 4 of 6 drawers were in cracked and broken pieces, only the drawer fronts were use-able. A side panel was cracked and the finish on it was in horrid condition but, I loved the strong lines and the price (I got it for free, thank you lady on Craigslist who was cleaning out her garage!). It took 9 months of sitting in our garage before I was able to do anything with it, and then another 2 1/2 weeks to get it to where it is now. My amazing dad helped a bunch by making new drawers for me while we visited for Christmas... basically the dresser would have ended up in a landfill if he hadn't steped in. After we came home with the drawers there was a ton of sanding, priming and painting involved, and numerous re-dos because of bubbling paint. I am so happy to have it done and in my little Bug's room.

Ah, finally done... all of the decorative trim was painted by hand in a black gloss and the dresser got 5 coats of glossy Navy paint. I'm still searching for those perfect handles, but someday I will find them.


(Bug couldn't wait to get his toys back "where they belong" even though mommy was still taking pictures.)

If you'd like to see more about the transformation, check out the 2 posts before this one :)


Thursday, January 27, 2011

LOL, I wasn't going to make you wait forever!


Here is the dresser!

A problem I ran into with this dresser, beyond the drawers needing to be rebuilt, were the drawer pulls. Some of them had stuck and stripped screws holding them in place, as a result they weren't usable when I finally got the dremmel to take them off. And, they are antique hardware, so matching them would be expensive, and frankly I didn't like them that much to begin with. So, I was left with this:
A pretty dresser without handles.

I tried putting yarn in until I could get the pulls I really want, but no matter how many large knots I put on the ends, they kept pulling out.

Then I got an idea for a cheap and easy fix.

Washers and ribbon.
The washers were $.79 at Walmart and the ribbon was $1.50.
First I pushed the ribbon through both holes with a half loop on the outside of the drawer ( I had it cut in about 6 inch strips).


Then I tied the washers to the ribbon on the inside of the drawer with half of a square knot.

I love how it turned out, and although the ribbon in not suppose to be perminant, it is cute and I may just keep it like this!
I think it could be a great way to add some cute decoration to a little kids room (girl or boy) and add interest to a plain dresser without having to paint.
Thanks for looking and have an awesome day!
Shared at:

Sneak peek...

I know I've been gone forever, but I have been working diligently on plenty of projects... they are just big ones that take more time than anything I've done before. One of those projects was refinishing a dresser for Bug. I've been holding onto this dresser for about 9 months, because I got it for free, but it needed a lot of work. 4 of the 6 drawers were broken and in shambles and I didn't have the tools to fix them... step in my AWESOME dad who built me new drawers while we were in phx, so now it has just been painting. As the title says, this is a sneak peek, so don't think you are seeing the dresser today (I'm mean, huh?) But I did come up with a cute way to show Bug where his clothes go... for that magical day when I teach him how to put away his own clothes.


I know, I'm dreaming.


Here is what I did:
(and yes, you are seeing a bit of the dresser too, but it has changed a little from the pic, no strings!)


Anyways, it requires the following:


Muslin


Freezer paper


Exacto knife


Fabric paint


Paint brushes


Iron


Now I'm not going to write a whole post on freezer paper stenciling, I'm going to let one of my favorite bloggers do that because she does it so well. So, hope on over to MADE and read her great post on freezer paper stenciling, it is super cool ;).


I thought of this project because I wanted Bug to KNOW where his clothes go so that I know where to find them. I also didn't want the excuse, "but I don't know where they go!"


First I cut the muslin to fit the drawers, it makes a great cheap drawer liner on its own.


Next I used a bunch of free clipart to make my images, I printed them out and traced them onto the freezer paper. I used my exacto knife and cute them out and then used the MADE tutorial to do the freezer paper stenciling.
I hope this makes putting away clothes easy and fun for Bug. Goodness, now daddy will know where to find things when mommy is out with the girls :D!
Have a great day everyone!
featured button

Tuesday, January 11, 2011

I'm still here :)

I am still around, we are home finally, however the Flu has taken over out house. When everyone recovers I should be able to finish a project or two that I have been working on... Ben's dresser, toy organization, another table and a nifty storage solution. I might even talk Jon into the bed project I've been considering. I am also brainstorming a tufted daybed for our guest room... in my mind it is easy, but I guess that time will tell on that one. :) I hope you all had a very Merry Christmas and a Happy New Year!